
As most people know, the kitchen is now the heart of the home and one of the most important ways to raise the comfort, energy efficiency, value and desirability of your home
Reasons to renovate the kitchen are usually because of poor layout, inadequate lighting, outdated fixtures, small cramped spaces and dated cabinetry
Before you renovate your kitchen, its important to really definite the features you want in your new kitchen. Consulting a kitchen or interior designer such as Brian Paquette or Victoria Architect Randall Recinos would be a great idea ( we have used both of these talents on our projects ) If you do not wish to bring in a designer or architect at this time, you can certainly do it yourself, but make sure you get a thorough per-renovation inspection to identify any existing problems such as not only functional and aesthetic changes, but renovations that will make your home healthier for yourself and your community.

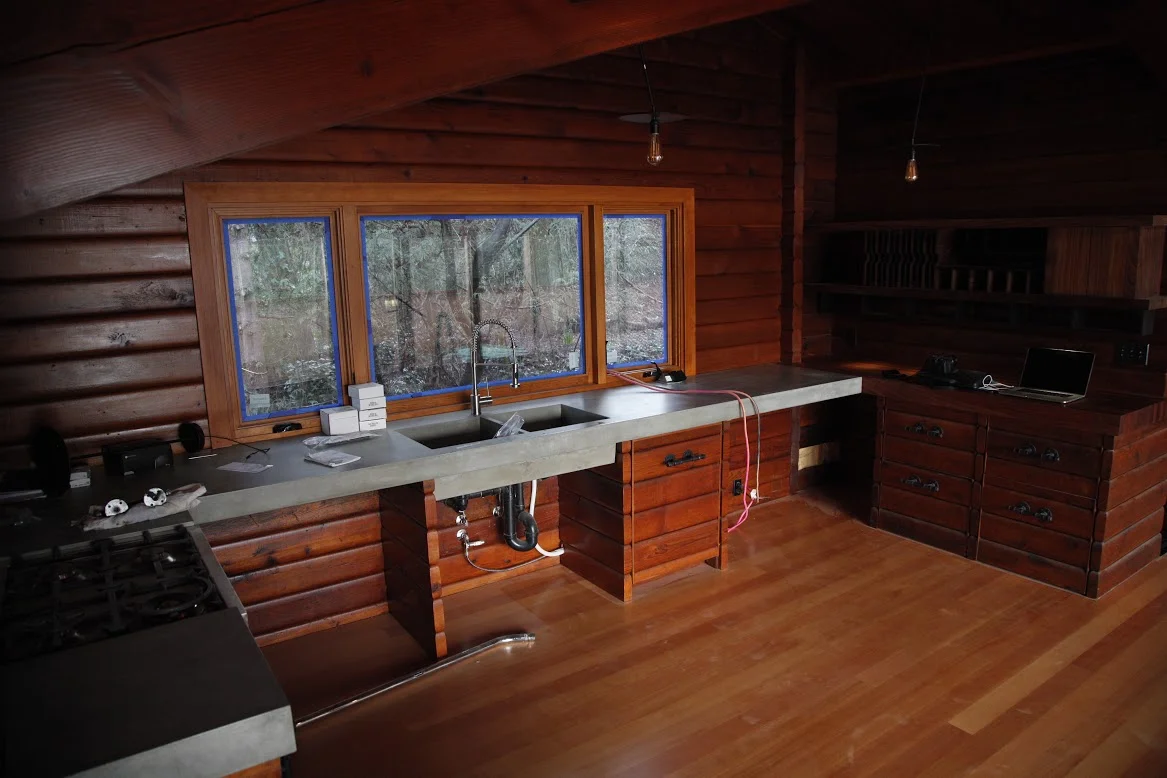
One of our kitchen renovations with gorgeous polished concrete sink and modern fixtures
Moisture control - plan on perhaps using low emission materials and products, ventilation for improved indoor air quality ( IAQ )
Energy efficiency - effective air barriers and insulation, energy efficient task lighting and appliances
Fixtures and Appliances - Water resource efficiency appliances and fixtures
Environment - Durable materials that will last much longer and will minimize future waste in landfill sites are a great idea. Perhaps your kitchen design can include a compost and recycling center,
Recycle Appliances - recycling fixtures and appliances to reduce construction waste
Kitchen Renovation is the most common renovation for a home
A renovation can be as simple as installing new flooring or as major as enlarging the space and replacing all fixtures and finishes.
Why would you consider renovating your kitchen?
Design and Size - your existing kitchen is most likely too small or poorly laid out.
Appliances and fixtures - the fixtures and appliances may be worn out, inefficient or outdated.
Cabinets and counters- cabinet finishes counter top or hardware may be outdated, need replacement or repair
Structural issues - Structural changes or repairs may be in order
Moisture damage - the floor, walls or finishes may be unsightly or damaged due to moisture problems.
Electrical or plumbing - Older kitchens usually don't have enough electrical outlet sand circuits. Older plumbing and fixtures may include lead or galvanized steel piping.
Ventilation and heating - older kitchens often have inadequate ventilation or heating systems. The kitchen may be poorly insulated and have a high degree of air leakage - both factors lead to high energy consumption.
Finishes - older finishes may be unattractive or not durable enough to withstand daily wear and tear.
HVAC - Kitchen renovations often include changes to HVAC equipment that can improve indoor air quality and moisture management in the house. Be careful choosing large volume exhaust fans because they can cause combustion heating equipment to back draft. Making important structural changes to your kitchen may give you a chance to improve air tightness and insulation which will of course incrse your comfort and the durability of your home.
Benefits
Repairing structural problems like fixing leaks and making sure that all services are adequate will prolong the life of your home and make the renovation look and work better
Painting - Try to use low odour and easy to clean finishes which will improve the IAQ of your home. Reducing condensation and controlling humidity will help or prevent mold growth.
Planning - Again detailed planning will result in a warm, comfortable, usable kitchen with good lighting and plenty of storage and work areas
Value of your home - if you take the time to think, plan and execute the renovation of your kitchen, carefully, it will most definitely increase the value of your home.
Life changes during renovation - Be aware, once you start your renovation, there's no turning back. Your life will be disrupted and any unexpected problems will lead to higher costs and delays in finishing the project. If you have thoroughly planned, this will help you to develop a realistic understanding of the work to be done and the costs involved. Hiring a qualified professional such as conradconstruction.ca who can deal with your unique situation ( as every situation is unique ) by doing a thorough investigation, find the problems and suggest the best solutions and design
Size and design
How much work space do you really need ? Do you want an eating area in the kitchen?
Is there adequate storage space?
What is the traffic flow of your kitchen like now and how do you wish to change it?
Does the kitchen meet everyone's needs in the home? Including any special needs of extended family and guests?
Options - Plan in details before you start. A clear space reorganization is sometimes very effective and may be all you need.
Consider adding space from adjoining areas to meet your space and function needs
A Designer can help you plan to best meet your existing and future needs. You will have to live with the results, so a perfect design will ensure they meet all your needs. A poor layout will seriously detract from your enjoyment of the renovation
Flexible layout - Flexibility of the design must be enough to meet existing or future demands for space, storage and anyone with special accessibility needs such as wheelchair access.
Appliances and Fixtures
Do the existing fixtures and appliances have years of useful life left ?
Do you like the features and styles of your appliances? Are they energy-efficient
Is there adequate general and task lighting
Options - Replace or repair worn out fixtures and appliances
Familiarize yourself with available products and options
Choose efficient fixtures that will reduce electricity and water consumption s. New kitchen appliances carry an EnerGuide label identifying their energy efficiency rating.
Update lighting so that it provides the brightness you need. Compact fluorescent light fixtures are four times more efficient than standard incandescent bulbs, but there are also warmer, pretty lighting choices that are also energy efficient such as halogen.
Old fixtures may have to be replaced later and the new fixtures may not fit into the spaces allowed. This will probably involve further modification of the room layout tor cabinets. Recessed lighting around task areas is always a good idea
If you don't do your homework, you may find more appropriate, appealing appliances or fixtures after you have completed the reno.
Outdated lighting and appliances usually means higher ongoing energy costs and one way to make sure your renovation doesn't come to full fruition
Cabinets and counters
Are existing counter tops or cabinets damaged? Is there enough work and storage space? Repair or replace damaged or outdated cabinets or counters.
Install additional cabinets or counters to meet your work needs. Consult with a kitchen planner to organize storage and work space more efficiently. ( we have a kitchen planner on call )
Damaged, hard-to-clean counters can harbor bacterial . The kitchen may be less functional and unappealing work and living space
Structural issues
Are there any existing structural deficiencies in this are or nearby ares of the house?
Do any structural walls or lintels need to be removed?
Will special structural details be required for new installation of windows or doors
Are the ceiling, floors or basement area well insulated and air sealed to provide comfort and energy efficiency?
Options
Carry out a through inspection. You may want to hire an expert at this point, or of course, we will be doing this before any reno
Repair, replace or strengthen structural components so they can carry the new loads.
Remove wall coverings when possible, to properly insulate and install a sealed air and vapor barrier. The open wall cavities will also make it much easier to install new plumbing, wiring and other services.
Structural deficiencies can lead to cracked finished, bowing, floor vibration or displacement of walls, floors or roof structures which could possibly call structural failure
Insulate and air seal the building to provide warm interior surfaces and a draft-free space
Exterior walls that are poorly insulated and not air - sealed will lead to continued high energy costs, possible condensation problems and discomfort in the living space
Moisture
Check the finishes for moisture damage
Is there visible mold growth on any surfaces? Are there any water stains?
Check for blistering or peeled paint
Does any of the caulking or grout look cracked or missing?
Has there been any condensation on the ceiling, wall or windows?
Find out where the source of the moisture is. It could be from plumbing or building leaks or condensation of humidity on cold surfaces
Clean up visible mold growth ( check your local guidelines on this )
Insulate, air-seal and use energy-efficient windows to provide warmer inside surface temperatures
Replace or repair all deteriorated finishes or structural components
If you hide or do a superficial clean up of moisture damage behind new finishes, they will continue to deteriorate.
Mold growth caused by excess moisture can be a serious source of IAQ problems
Unsolved water damage problems will continue and lead to further deterioration of your newly renovated area, so be thorough and vigilant
Make sure you maintain all flashings, grout and caulking to prevent water access to the building structure
Heating and Ventilation
Is the room comfortable and easy to heat?
Do you see any excess condensation forming on interior surfaces or windows?
Is the air fresh and clean? Can you smell any mustiness?
IS there adequate heating to the area. Poor insulation levels and high air leakage will make the area hard to heat, uncomfortable and drafty.
Would there be danger of back draft with a large exhaust fan ( oil or wood stove, furnace or water heater)
Is there an exhaust fan that is properly duct-ed to the outside?
If you wish to install an exhaust fan with adequate airflow capacity, the fan should be quiet with a sound rating of 3.5 and a flow rating of 50 L/s. Make sure your ventilation appliances are certified by HVI ( Heating and Ventilating Institute)
Install an entire house ventilation system if possible. Consider one that includes heat recovery. Ensure the installation is done by a licensed installer for heating and ventilation work. By using a contractor like us, you can be sure that it will be installed properly by a licensed and trained technician
If you do not bring in proper heating or install it properly, the heating system may not be able to maintain a comfortable temperature during the cold, windy winter months and lingering odors and excess humidity in the house will always be an issue.
Be careful with large volume exhaust fans which can cause back drafting ( smells, smoke or toxic gases escaping into the house ) of combustion equipment such as fuel burning fireplaces, furnaces, wood stoves and water heaters that use oil, natural gas or propane.
Finishes
What finishes will be durable enough for the intended use. For example counters, floor covering and wall finishes? A designer can help you with this or you can of course do your research. It needs to be functional, safe as well as aesthetically pleasing.
Are the planned materials and finishes low odour and low in chemical emissions such as volatile organic compounds
What prep is required for the new finishes? Do you need special skills to install the finishes?
Decide what finishes need to be repaired or replaced. Do your research. There are many new and different products on the market. Vinyl, ceramic and hardwood flooring all have different install requirements. We will be talking about this in our newsletter, so please subscribe
Choose products that are designed to meet specific needs - water resistance, durability or cleaning
Choose low odor materials finishes and adhesives to minimize effects on IAQ
Use a qualified installer for products that require special installation conditions or skills
Improper installation of finishes will void the warranty and may provide unattractive results
Cracked ceramic tile or grout are common problems resulting from in adequate sub floor strength and stiffness
Hardwood flooring can shrink or swell if it is not allowed time to condition of the humidity of the space before installation or if is not sealed properly
Potentially harmful emissions from new materials can linger for periods of time within the house. Take of of these into consideration
Skills you will need to do some of the work on your renovation
Remove old fixtures and finishes
Install insulation
Paint
Air seal the building
Caulk or repair roof and window leaks
All structural changes, finish work or to undertake the complete project management, really need to be done by a professional renovator such as ourselves
IF you are doing it yourself, you will still need to hire subcontractors to carry out most tf the electrical, plumbing, heating and ventilation work. IF the renovation is extensive, roofers, window and door installers, cabinet makers and installers, flooring or paining professionals . Remember to obtain all necessary permits, sign a written contract, ensure that workers are using safe working practices and have professional licenses where required and are covered by WCB.
Good luck and happy renovating
Thorough planning is the key

